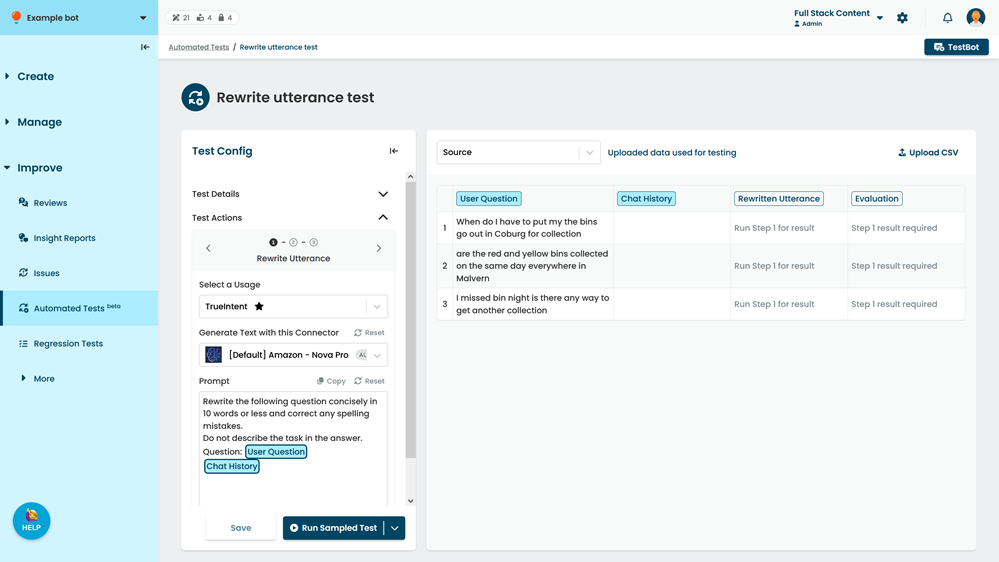
This is the first step in an automated test. It runs the LLM task you're testing for each test case you provide and generates an output. You'll use this output in steps 2 and 3 to run evaluations and then generate insights and prompt refinements.
For example, if you create an automated test for the rewrite utterance task, the first step will be Rewrite Utterance, and it will generate rewritten utterances for a set of example user utterances you provide.
You need an administrator or publisher role in your team to run automated tests.
When you create the automated test, the prompt and connector of your primary usage for the task you're testing is copied into the generate text step as a default setting. This configuration is a copy only: if you make changes to your task prompt after you create the test, those changes won't be copied into your automated test. If you want to run tests using your updated task prompt as a default, create a new automated test for that task.
Before you run a test, you can change the usage, prompt, and connector. These changes only affect the test: they won't impact your task, usage, or other automated tests, so you can safely experiment with new prompts and connectors. You can reset your test to the default connector and prompt at any time using the Reset button above the connector or prompt field.
You can't change the task of an automated test once you've created it. If you want to run tests on a different task, create a new automated test for that task.
Try a sampled test first
Running a task for a large set of test cases can take a while. If you're testing a new connector or prompt, run sampled tests first to generate a small set of responses you can use to make adjustments before you run the full test.
To run the LLM task and generate output:
- Click Improve in the left navigation, then click Automated Tests.
- Click the automated test you want to use or create a new automated test.
- At the top of the results pane, select the test cases you want to use:
- Select Source to use the data from the uploaded CSV.
- Select a result set to re-run the task on the same test cases.
The test creates a new result set. The original result set won't be changed.
- Select Step 1.
Use the left and right arrows next to the step name to switch between steps. - If you want to run the test using another usage, select the Usage.
- If you want to run the test using a different connector, select the Connector.
Only connectors in your chatbot that are suitable for the task are available. - If you want to run the test using a different prompt, update the task Prompt.
Use '@' to add a prompt variable. Only prompt variables compatible with the task you're testing are available.
Make sure you don't delete the prompt variables. - Click Save.
- Either:
- Click Run Sampled Test to quickly test your configuration with a small sample of test cases.
You can configure the sample size in your automated test usage. - Click the arrow next to Run Sample Test, then click Run Full Test to generate text for all test cases.
- Click Run Sampled Test to quickly test your configuration with a small sample of test cases.
Once you have generated your task output, use Step 2 to evaluate the output.